Showing posts with label Crafts. Show all posts

Tuesday, December 14, 2010

Classroom Treat - Christmas 2010

Snowmen on my mind

Aren’t these SUPER cute! 


Melted Snowman (LOVE THIS)
I had every intention of making these for my boy’s classmates, but I can honestly say it’s not happening (major bummer). Maybe I will make them next week, for neighborhood friends and family. If you want the how-to's, head over to The Idea Room and Amy will show you!!! 

But I did spy these darling marshmallow treats over at eighteen25 and I know that I can definitely make them. 


So sugarplums will be dancing in my house over the next few days.


Happy Treat Making To You,

Megan

Friday, December 03, 2010

Tutorial - Ornament Wreath

Fun wreath and so easy to make

So how did I make the wreath on my front door? 


Here is the tutorial from Eddie Ross. The best thing about this wreath is that it’s super easy to do. Go check it out and then come back and tell me all about the wreath you made ( I just know you will want to make one after you see how simple this is). Go ahead, I'm waiting.

FYI - I bought a package of shatterproof ornaments from Wal-Mart and had my son help me string the ornaments on. Needle nose pliers do make this much easier!


I just need to make a bigger bow to hide the hanger! Anybody know of any good bow making tutorials? I really struggle with making cute bows!


Happy Wreath Making to you,

Megan

Thursday, December 02, 2010

Paper Snowflakes Tutorial

The cutest snowflakes

Wanna make your own paper snowflakes? 


Here’s the tutorial I posted a few years ago!


Happy Flaking to you,

Megan

Monday, October 18, 2010

Classroom Treat

Don’t be just any type of sucker


…be a mummy too!!!


Just a few more weeks until the boy’s class parties and I am almost finished with the little treat for them to pass out to their classmates.


Supplies:
Sugar Daddy suckers
Gauze
Googly Eyes (7mm)
Black ribbon
Black ink
Glue

How To:
1.   Cut your gauze in 2.25” x 10” strips. I was able to find cotton gauze at the 99cent store.
2.  Cut the black ribbon to be 9”.
3.  Print out onto cardstock some cute tags, cut them out and then distress the edges with black ink. Punch a small hole in one corner (big enough for your ribbon to pass through). Slip the ribbon on the tag.
4.  Take one sugar daddy sucker and start wrapping the gauze around it and then twist it around the sucker stick. Secure it in place with the ribbon.
      5.  Glue on the googly eyes! 


As you can see, it’s pretty easy to do and I was able to get several items at the 99cent store and WalMart. This cost me about 15 cents a sucker (I had ribbon and ink already so that cut down my cost). 


Happy Creating to you, 


P.S. If you would like me to send you the tag, just leave me a comment with your email address.

Tuesday, August 10, 2010

I Love Vinyl
Just a few weeks left until our little one makes his grand appearance and I am trying to put the finishing touches on the nursery.

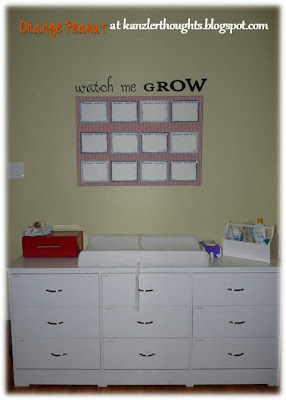
Last year I covered a bulletin board with my favorite ticking stripe and used it as part of my Christmas decorations. I decided to use it in the nursery so I hung it in the baby’s room and have had it there for a few months.


I have been trying to figure out the best way to use it. Now if I was having a girl I would have attached ribbon and made that a darling bow holder board. Something tells me that my little boy wouldn’t really need the hair bows, so I had to come up with something else.

Last week an idea popped into my head that was the perfect use of the darling bulletin board. Why not use it as a growth chart?

I usually keep a photo album that documents each week of my child’s first year, but I knew I couldn’t fit that many pictures on the board so I decided to use the board to display a picture a month for our little guy’s first year. 


I made a mat for each month (I can’t wait to start putting pictures on it) and then cut out the tag line “watch me GROW” using my handy dandy Cricut and some black vinyl. My friend Kelsey had just used that wording on one of her recent scrapbooking pages and it was perfect for this too. 


One more thing done and just a few more to do before baby comes!

Last week, at 36 weeks!

Happy Sticking To You, 


Tuesday, June 22, 2010

Firecracker Craft Project – Kid Friendly

I love the 4th of July! I love our country and we have a good time celebrating all that we are blessed with!!! To help get us in the spirit, we made firecrackers out of toilet paper tubes!!!!
Here’s What You Need:
1 – Toliet Paper Tube
1 – Paper Towel Tube
Scissors
Red, White, and Blue Paint
Paint Brushes
1 - Chenille Stick (whatever color strikes your fancy)
Tape
Ribbon

How To’s:
1.    1. Cut the paper towel tube so that you have 3 tubes at different heights. I cut the paper towel tube to about 4.5” and 5.5”. You won’t need to cut the toilet paper tube.

2.    2.Paint each tube one of the 3 colors. Be sure to paint about an inch down on the inside of the tube (on the side that will be the “top” of the firecracker). Let dry!

3.    
     3.Cut your chenille stick in half and then take one of the halves and cut that one in half. So you should have 2 smaller pieces and one longer.
4.    
     4.Attach the longer chenille stick in your tallest tube with tape. You could use a glue gun for this but tape worked for me. It kindof bugged me that I couldn’t put the chenille stick in the center, but I really didn’t want to have to worry about jimmy-rigging the top so that I can center it – so I let it go, that need for perfection!!!!
5.    
     5.Gather your 3 firecrackers and tie them with your cute ribbon.

6.    6.Ta-Da – you are finished!


     Happy Crafting to You and Yours,


Linking up to:


Wednesday, May 26, 2010

Is that ribbon in your gutter?

So I have seen vinyl rain gutter's used as book display shelves but I wanted to find a way to have easy access to my ribbon and to have an interesting way to display it. So why couldn't I banish my ribbon to the gutter?


Here's the finished look:

Supplies and the How-To:
*1 Vinyl Rain Gutter - 10ft (I got mine from Home Depot for about $5)
*1 Miter saw and miter box
*Gutter Braces/Hangers (also from Home Depot for about $1 each)
*Gutter End Caps (sold in pairs at Home Depot for about$6)

1. Measure the length you want your ribbon holder and then transfer that measurement to your rain gutter using a sharpie.  

2. Cut your rain gutter using the miter saw and box. You will need to use some muscle and be sure that the gutter is secure as it will slip.

3. Once the gutter is cut to size, slide the braces onto the lip of the gutter (see picture below).


4. After the braces are in place the end caps on each end - you can see part of the end cap in the above picture.

5. Place the braces at equal distances from the edge and then screw into the wall (you may need to use dry wall anchors if you are not screwing into a stud). Note: I placed my braces 10.5 inches from each end (the gutter is 52" long)

6. Send your pretty ribbons to the gutter! Please note that the larger spools of ribbon do not fit into the gutter but because I am a hoarder of ribbon (and fabric too) I still have a few (okay a lot) of ribbon still in drawers. 

* Because I still have over 5.5 feet of gutter left (and we purchased extra braces and end caps) I will be making some book shelves for my boys room! Maybe this will prevent the collection of books from appearing behind the bunkbeds - one could hope right?


Now get your mind out of the gutter and create something today,


Sharing the good stuff here:


Visit thecsiproject.com


</p><p>http://www.thethriftyhome.com

Show and Tell Green


Make it Yours @ My Backyard Eden


Organize and Decorate Everything

Join us Saturdays at tatertotsandjello.com for the weekend wrap up party!


Monday, May 10, 2010

Ta Da

... presenting, my new crafting area!!!! Happy Mother's Day from my boys!!!! Thank you so very much honey and my little ones for making this possible!


The desk cabinets were free (love Craigslist). We sanded them down, my youngest and I painted them, and my husband surprised me with putting them in my nook and adding hardware and the desk top! Trust me sanding and painting them was quiet a task seeing that I don't feel that well, but I was determined to have this finished.


My wonderful husband hanging the pegboard! He even added trim. 


This was waiting for me this morning. So spoiled and I am so indeed grateful for the love.


Ryan added a shelf, lights under the shelf and will install a vinyl rain gutter that will hold my ribbon!!! 


I love when my design sketches come to fruition and look so much better than I imagined. Thank you dear for helping me make the pencil drawings so beautiful in person!


I love the pegboard!!!! 


We just have a few more things to do to finish this craft area and then we will be able to move on to the nursery. Here's to hoping I feel less queasy soon so that I can take advantage of this space!!!


Happy Crafting to you,

Thursday, May 06, 2010

A+

My oldest son has a pretty great teacher this year and to show her our appreciation we have given her a little gift each day this week!


I borrowed a few of these ideas and then came up with some of my own. What are some things you have done to show teacher's the love?


Day One - O"fish"ally the best! You can use goldfish crackers too!

Day Two: Coming to the "Aide" - lemonade packets that you add to water. You could use lemon drops.
I didn't get a picture of the ones I made for Day 3 or Day 4 but above is the tag that went with it.

Day 3:
"Scent"sational - a container of air freshener, candle, or a plugin type of gadget, etc...

Day 4: Hugs and Kisses for all you do - a bag with Hersey's Hugs and Kisses


Day 5: You are worth 100 Grand! I have to admit I munched on a few of these 100 grand bars - I'm worth at least 100 grand too!!!

Many thanks to those who choose to teach and enrich my children!!! I'm glad we have you on our team as we raise our boys to become awesome adults!

Happy Appreciating to you,

Wednesday, April 21, 2010

Craft Corner in the making


To make room for baby, I had to find a place to move my craft/sewing room and we had the perfect spot that was being occupied by a broken piano (I had a piano tuner come out and tell me that it would cost as much as a new piano to fix it). So we had to get rid of this beauty. 


We were thrilled to find a smaller piano that we could put in our front room,


 ...hence making room for my craft stuff (or craft crap according to my husband ;-)


It is still a work in progress but here is what we have so far. Huge thanks to my supportive husband, IKEA cabinets, plastic storage bins from Target, and my handy-dandy label maker!


In between the cabinets I will add a table (on wheels), pegboard, and a few  shelves. I am getting so excited for it to be finished.

This is my sewing cabinet. It is so nice to have all my fabric and sewing notions in one place. The other cabinet is for all my craft/scrapbooking supplies (I am still in the process of organizing that one).


Happy Organizing to you,

LinkWithin

Related Posts with Thumbnails