Showing posts with label Tutorials. Show all posts

Tuesday, December 14, 2010

Classroom Treat - Christmas 2010

Snowmen on my mind

Aren’t these SUPER cute! 


Melted Snowman (LOVE THIS)
I had every intention of making these for my boy’s classmates, but I can honestly say it’s not happening (major bummer). Maybe I will make them next week, for neighborhood friends and family. If you want the how-to's, head over to The Idea Room and Amy will show you!!! 

But I did spy these darling marshmallow treats over at eighteen25 and I know that I can definitely make them. 


So sugarplums will be dancing in my house over the next few days.


Happy Treat Making To You,

Megan

Friday, December 03, 2010

Tutorial - Ornament Wreath

Fun wreath and so easy to make

So how did I make the wreath on my front door? 


Here is the tutorial from Eddie Ross. The best thing about this wreath is that it’s super easy to do. Go check it out and then come back and tell me all about the wreath you made ( I just know you will want to make one after you see how simple this is). Go ahead, I'm waiting.

FYI - I bought a package of shatterproof ornaments from Wal-Mart and had my son help me string the ornaments on. Needle nose pliers do make this much easier!


I just need to make a bigger bow to hide the hanger! Anybody know of any good bow making tutorials? I really struggle with making cute bows!


Happy Wreath Making to you,

Megan

Thursday, December 02, 2010

Paper Snowflakes Tutorial

The cutest snowflakes

Wanna make your own paper snowflakes? 


Here’s the tutorial I posted a few years ago!


Happy Flaking to you,

Megan

Thursday, June 10, 2010

Jar Full Of Beans


We have had a few weeks of less than desirable behavior here in our neck of the woods, about a month or so ago. I was so tired of having to always be correcting the negative behavior that I needed something to help focus more on the positive (while still disciplining for the not so stellar behavior).

So as I was looking through the different blogs I came across another’s idea of a Treasure Chest. Now I can’t take credit for this idea but I am totally blaming my inability to find or remember where I saw it at to my pregnancy/mother brain. I really wish I could give credit where it is due, but please forgive me. I have been scrolling through the blogs I subscribe to and I can’t find it. If you know who originally posted it, please let me know!!!

Anywhooooo, we had a family meeting where we discussed the behavior and attitudes of each of us and how it contributes to our family. We made a list of “rules” of how we ought to act and we all agreed on them.


I then shared with my boys their Treasure Chest Chart and their bean jars (the bean jar part is something I added to help reinforce the good and bad behavior). I explained that every time their father or I caught them doing good things and following the family rules we would add a scoop of beans to their jars. If they pointed out the good things they were doing, they would not get beans added. If they added beans on their own the result would be that I would empty their entire jar and they would have to start over. If they were observed doing negative things then their father or I would remove a scoop of beans from their jar.


Before bed each night we look at where the beans are and if they reach to the top of their name tag, they get to add a sticker to their chart. If the beans reach to the top of the jar, they will get to add 2 stickers to their chart. Once they have 5 stickers on the chart (with the 5th one covering the treasure chest), they get to pick something out of the treasure chest basket (which is filled with all sorts of toys and trinkets).


Note: When the beans reach the top of their name, I leave them like that for the next day. They get to start off with the jar so close to the top. When the beans reach the top of the jar, I empty the jars and they start over from the beginning the next morning.

I can’t express to you the change in behavior we have had. It does sound a little silly saying “I don’t want to take any beans out of your jar” but, after a week of doing this program, we rarely have to even remind them. They get very excited when they see us adding beans and it seems to hit home when they see us taking beans out!

There has been less raising of voices, more kindness and thoughtfulness, and an overall better feeling in our home!!!


What are some things that you are doing to encourage the good?

Happy Family to you,

Thursday, June 03, 2010

Let's Get Stomping

My youngest came home from preschool with these fun dinosaur feet. I thought I would share the cleverness of his teacher and give you the how-to’s for a simple summer craft.


What you need:
-     - 2 large tissue boxes (leave the plastic in the opening hole - see the picture above)
-     - Different colored foam sheets - to make the toenails
-     - Paint and Glitter to decorate the boxes. You could also use paper to cover them
-     - Scissors
How To’s:
1.   1. Have your child paint the tissue box. If you would rather, have them pick out different colored paper, cut to size, and then glue that to the boxes.

2. 2. While the paint is still wet, sprinkle glitter all over the boxes. If you went the paper route, be sure to put glue on your boxes and then sprinkle the glitter.

3.  3.Have your child cut out 6 triangles from the foam sheet

4.  4.Attach 3 “toenails”, with glue, to each tissue box – on one of the skinny sides, near the front.
5.  5.Once the “feet” are dry, they are ready for your little dinosaur to stomp around in.

 Happy Stomping to you,

Wednesday, May 26, 2010

Is that ribbon in your gutter?

So I have seen vinyl rain gutter's used as book display shelves but I wanted to find a way to have easy access to my ribbon and to have an interesting way to display it. So why couldn't I banish my ribbon to the gutter?


Here's the finished look:

Supplies and the How-To:
*1 Vinyl Rain Gutter - 10ft (I got mine from Home Depot for about $5)
*1 Miter saw and miter box
*Gutter Braces/Hangers (also from Home Depot for about $1 each)
*Gutter End Caps (sold in pairs at Home Depot for about$6)

1. Measure the length you want your ribbon holder and then transfer that measurement to your rain gutter using a sharpie.  

2. Cut your rain gutter using the miter saw and box. You will need to use some muscle and be sure that the gutter is secure as it will slip.

3. Once the gutter is cut to size, slide the braces onto the lip of the gutter (see picture below).


4. After the braces are in place the end caps on each end - you can see part of the end cap in the above picture.

5. Place the braces at equal distances from the edge and then screw into the wall (you may need to use dry wall anchors if you are not screwing into a stud). Note: I placed my braces 10.5 inches from each end (the gutter is 52" long)

6. Send your pretty ribbons to the gutter! Please note that the larger spools of ribbon do not fit into the gutter but because I am a hoarder of ribbon (and fabric too) I still have a few (okay a lot) of ribbon still in drawers. 

* Because I still have over 5.5 feet of gutter left (and we purchased extra braces and end caps) I will be making some book shelves for my boys room! Maybe this will prevent the collection of books from appearing behind the bunkbeds - one could hope right?


Now get your mind out of the gutter and create something today,


Sharing the good stuff here:


Visit thecsiproject.com


</p><p>http://www.thethriftyhome.com

Show and Tell Green


Make it Yours @ My Backyard Eden


Organize and Decorate Everything

Join us Saturdays at tatertotsandjello.com for the weekend wrap up party!


Thursday, April 08, 2010

Play Kitchen + Storage

Can I just say there are some amazingly creative people out there! I found one and wanted to share what she came up with.

Jenn over at Delicious Ambiguity came up with this clever play kitchen with storage included. For her how-to's check out her blog at http://delicious-ambiguity-nennyk.blogspot.com . What are you waiting for....go.... see her crafty genius for yourself!!!!


Happy Creating to you,

Wednesday, March 24, 2010

PEEPS for the Class

What do you get when you take a bunch of these....


... and some of these...

...and put them inside these?


Spring Treats for your child(ren)'s classes!

So I borrowed an idea I saw on another blog (I would give credit but I can't remember where off the top of my head and I'm too lazy to search for it).

Here's how to make it:

Ingredients
* Peeps (I used 3 per bag so you will have to do the math to figure out how many you will need)
* Cellophane goodie bags - about 4"x10" (you can get them at most craft stores and even at WalMart)
* Cardstock tags (if you want to use the one I made, just leave me a comment with your email and I will send the file to you)
* Scissors
* Stapler

Step-By-Step
1. Print, cut, and fold the amount of tags you will need
2. Cut off the top 1" of your cellophane bags (a bit tedious but it makes the end result look better)
3. Put 3 peeps in the goodie bag
4. Fold the bag over and then sandwich it in the fold of the cardstock tag.
5. Staple the tag onto the bag
6. Repeat until you are done

Note: your fingers might end up the same color as the peeps you use!

Happy Gifting,

Tuesday, March 09, 2010

Clever Kitchen Remodel

So since I have been a major dud lately and have not felt well enough to post anything or share any new crafts, I thought I would at least show you something that has my mind racing. Becca over at Nap Time Journal (click on the blog name) recently posted her how-to's on a clever kitchen remodel she did.


She took a thrift store bookcase and transformed it into a play kitchen. So go over to her site and see her tutorial on how to create this baby! Thanks for the inspiration Becca!

Thursday, December 17, 2009

Teacher's Gifts - Magnet Message Boards

Let's face it - our children's teacher's do so much! Each year we (read as "I") make some gift as a token of our appreciation. This year I am particularly pleased because I had a helper! (Peanut #1 was not as excited to help but he did pick out the paint color and the sayings)

Carson actually painted the board for his teacher! I was so happy to have a helper!
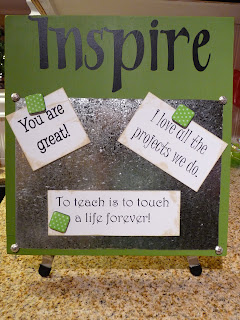
Here is the finished project! I forgot to take pictures of the process! The how to's are pretty simple and are listed below.

Carson was so excited to give the magnetic message board to his teacher. She really seemed to like it!


Magnetic Board Tutorial (my apologies for the lack of pictures)

supplies:
- wood (cut to whatever dimensions you would like) - Mine is 12"x12"
- sander with sandpaper
- paint (pick your color)
- sheet metal
- tin snips
- vinyl lettering
- decorative nails (I found them in my local fabric store near the chair upholstery items)
- liquid nails (be sure it says that it will work on metal, some types of liquid nails do not)
- Saw-tooth picture hangers
- Magnets
- Cardstock tags with your custom sayings

How To's:

1. Cut your wood to desired size.

2. Sand the edges of the wood to make it smooth. Be sure to wipe off with a tack cloth to get rid of all the saw dust.

3. Paint the wood desired color. Let dry. (you may need a few coats)

4. While the paint is drying cut out your vinyl lettering. I was able to use my early Christmas present - the Cricut Expressions cutting tool. If you don't have one of these bad boys you can purchase ready to use vinyl at most craft stores or you can order it from my friends over at Ellemenopea.

5. Once paint is completely dry, adhere your vinyl lettering where you desire it. *If you would like a distressed look, be sure to sand down the edges of the wood before you attach the vinyl!

6. Cut the sheet metal using tin snips to your desired size. I made the sheet metal a little bit smaller than the board so that I could see some of the wood on the edges.

7. Once sheet metal is cut, place liquid nails on the back of the sheet metal. (Be generous with your adhesive in the middle of the sheet metal, but don't just clump it on. Be sure to LIGHTLY coat the edges. Too much adhesive on the edges and it will spill out from underneath the sheet metal when you attach it and create a mess.) Adhere to the wood in the desired place. Be sure to you use a rolling pin so be sure to spread all of the adhesive around.

7. Let dry. I usually cover with something heavy to help it dry with a tight bond.

8. Once it is dry, hammer in the decorative nails near the corners of the sheet metal.
9. Add the sawtooth picture hanger to the back (be sure to make sure you have it on the right end. I have made this mistake before). Measure carefully so that it will be in the center - you don't want your beautiful project to hang crockedly!

10. Create custom sayings for the receiver out of cardstock. Once printed cut them out and then ink the edges.

11. Hang the card stock on the magnet board with magnets. It is ready to give!


Happy Creating to you, Megan

Monday, November 16, 2009

So Happy To Be Stuck With You

I love my new magnet board that I made last week! It was really a quick project and we love being able to display the artwork of our little ones!

What you need:

- Picture frame the size you would like (the frame measures about 2ft x 3.5ft)
- Sheet metal, cut to size
- Spray paint
- Adhesive (hot glue or another fast drying glue)
- Staple gun
- Picture hanger

I went to a thrift store and bought a large picture with a wood frame. I was more interested in the frame - could I paint it, was it in good shape, could I remove the picture that was in it, was it the size I wanted, etc...). I found one for $10 (sorry I don't have a before shot). It was brown with an off-white fabric band and a little bit of gold metal. I then went to my local Home Depot and bought a sheet of sheet metal for about $18 - the guy there was nice enough to cut it to the size I needed(I didn't include the exact sizes for this frame because yours would be different. Be sure that you measure the picture that you removed from the frame). I have about half a sheet of sheet metal left so I can make a few smaller magnet display frames. I then bought black spray paint for $2.

How To:

1. Remove the picture from the frame. Save the picture so that you can get your sheet metal measurement from it.

2. Lightly sand the frame and be sure to wipe it down after.

3. Spray paint the frame the color you would like it. Let dry.

4. After frame is dry place a small bead of glue to the frame lip where the sheet metal will rest (I used hot glue and it hardened too fast for me to do this. I had to do one side at a time. It was pretty tricky. Next time I would use a different type of glue, I was just too impatient and didn't want to wait for it to dry).


5. Use the staple gun to place loose staples into the side of the frame to act as an extra hold for the sheet metal.

6. Attach your picture hanger to the back of your frame

7. Hang it where you would like in your home and enjoy!!!!


Happy Displaying to you, Megan


Wednesday, October 14, 2009

Halloween Goodies

Peanut #2 and I made Halloween Crackers for his classmates. They are easy to do and make such a nice treat.


What you need:
- Halloween napkins - the number you are wanting to make (beverage size)
- TP cardboard rolls - the number you are wanting to make (I save them already because I use them for crafts throughout the year)
- Small goodies and candies to put inside your cracker (we put bubblegum, pixie sticks, bubbles, candy balls, a small toy and a sour ball in the treat)
- Coordinating ribbon
- Scissors
- Scrapbooking Adhesive (or double sided tape)


Step 1:

Open the napkin and place it right side down on a table top. Along the top edge near the center of the napkin place a small strip of adhesive. Center the toilet paper roll on the adhesive. Roll the napkin over the top of the tp roll to cover it. Place another small strip of adhesive near the end of the napkin so that the napkin will stay put. Gather one end of the napkin and tie closed with ribbon.


Adhesive along the top


Place the roll on the adhesive


Roll it


Stick it


Tie it

Step 2:

Fill the cracker with goodies through the open end.

Step 3:

Gather the open end and tie it closed with ribbon.


Viola! Easy as 1,2,3!

You could also add another piece of paper over the center of the cracker that has hand written or typed greetings (ex: Happy Halloween, Trick or TREAT, A Treat for You). Just wrap it around and use adhesive to attach it.


We are now ready for C-man's class party - too bad we have to wait two weeks to hand them out.

Happy Crafting to you, Megan

LinkWithin

Related Posts with Thumbnails