Let's face it - our children's teacher's do so much! Each year we (read as "I") make some gift as a token of our appreciation. This year I am particularly pleased because I had a helper! (Peanut #1 was not as excited to help but he did pick out the paint color and the sayings)

Carson actually painted the board for his teacher! I was so happy to have a helper!
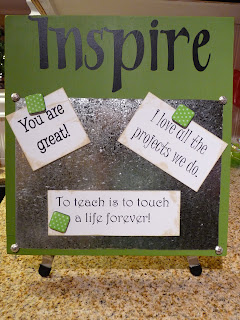 Here is the finished project! I forgot to take pictures of the process! The how to's are pretty simple and are listed below.
Carson was so excited to give the magnetic message board to his teacher. She really seemed to like it!
Magnetic Board Tutorial (my apologies for the lack of pictures)
supplies:
- wood (cut to whatever dimensions you would like) - Mine is 12"x12"
- sander with sandpaper
- paint (pick your color)
- sheet metal
- tin snips
- vinyl lettering
- decorative nails (I found them in my local fabric store near the chair upholstery items)
- liquid nails (be sure it says that it will work on metal, some types of liquid nails do not)
- Saw-tooth picture hangers
- Magnets
- Cardstock tags with your custom sayings
How To's:
1. Cut your wood to desired size.
2. Sand the edges of the wood to make it smooth. Be sure to wipe off with a tack cloth to get rid of all the saw dust.
3. Paint the wood desired color. Let dry. (you may need a few coats)
4. While the paint is drying cut out your vinyl lettering. I was able to use my early Christmas present - the Cricut Expressions cutting tool. If you don't have one of these bad boys you can purchase ready to use vinyl at most craft stores or you can order it from my friends over at Ellemenopea.
5. Once paint is completely dry, adhere your vinyl lettering where you desire it. *If you would like a distressed look, be sure to sand down the edges of the wood before you attach the vinyl!
6. Cut the sheet metal using tin snips to your desired size. I made the sheet metal a little bit smaller than the board so that I could see some of the wood on the edges.
7. Once sheet metal is cut, place liquid nails on the back of the sheet metal. (Be generous with your adhesive in the middle of the sheet metal, but don't just clump it on. Be sure to LIGHTLY coat the edges. Too much adhesive on the edges and it will spill out from underneath the sheet metal when you attach it and create a mess.) Adhere to the wood in the desired place. Be sure to you use a rolling pin so be sure to spread all of the adhesive around.
7. Let dry. I usually cover with something heavy to help it dry with a tight bond.
8. Once it is dry, hammer in the decorative nails near the corners of the sheet metal.
9. Add the sawtooth picture hanger to the back (be sure to make sure you have it on the right end. I have made this mistake before). Measure carefully so that it will be in the center - you don't want your beautiful project to hang crockedly!
10. Create custom sayings for the receiver out of cardstock. Once printed cut them out and then ink the edges.
11. Hang the card stock on the magnet board with magnets. It is ready to give!
Happy Creating to you, Megan


